 This week I put together this cute little cupcake kit for a friend of mine. She has two girls that are 5 and 6 yrs. old and I know for a fact that they like to help cook and bake. I haven't dropped it by their house yet, but I hope they will like it. Who doesn't like a cupcake every once in a while?!
For my cupcake kit, I simply put everything you need for them in a galvanized bucket I had gotten from the Target dollar spot. I included a box of cupcake mix, and hello, where have I been? I love to bake as you know, but I had never seen these Duncan Hines cupcake mixes. It is just a mix that makes 12 cupcakes. I thought it was great because sometimes that's all I want or need to make. Oh, back to the kit. I also included a container of icing, sprinkles, cupcake liners and cupcake picks that I made. I used neon green, orange and red so I thought it would be cute to wrap the icing container and sprinkles in coordinating paper. I know it was totally unnecessary, but it sure did make it cuter!! I hope this little cupcake kit will put smiles on their faces!


 I came into the living room yesterday evening to find this. Our little Ivy icing down her knee just like her daddy. My husband hurt his knee about 2 weeks ago and has been wearing a knee stabilizer and on crutches. Every evening when he comes home from work he lays on the "little couch" as the kids call it and ices his knee. Ivy likes to go and help him out with it. She's so a daddy's girl! I guess she wanted to actually try it out, too. Left knee and everything. Just like my husband's. She didn't leave the ice on too long before she said, "That's cold mommy!"
I feel like I've been super busy the past couple days. Maybe I'll have some new posts(with pictures) for you to look at soon. Today, part of my schedule includes taking Laci to her first guild auditions for piano. They are called auditions, but she is actually just being judged. Not sure why they call it an audition. She will play two pieces from memory. You can play up to fifteen pieces, but she's only been taking lessons for seven months so two is quite enough for her. She has them down pretty well and does a great job!She is excited to get her music club fraternity pin for playing her pieces. So, no matter how she is judged, I know she's practiced hard and done her best! That is what matters.
 It's the last day of my Family Home Evening installments so I thought I would end with a treat. Let's face it, the treat is probably the most anticipated thing. It could be just about anything, too;ice cream, brownies, fruit salad, pudding, etc. I think it's fun to see the kids make the treat when it's their turn to do it. I usually end up helping them a little with it if it has to be cooked, but they do a great job. With this particular treat above, Orange Icee, they helped put each ingredient into the blender. This icee is so simple and it's a cold, refreshing treat. You can get the recipe below. Also, visit my "recipes" section for more treat ideas.
Orange Icee
1/2 of a 12-oz. can frozen orange juice concentrate
1 c. milk
1/2 c. water
1 tsp. vanilla
1/4 c. sugar
16 large ice cubes
Put all of the ingredients into a blender and blend until smooth. Serves 3 to 5 people.

 I'm continuing this week's Family Home Evening theme with activities. This is the part that my kids always want to get to. The really fun part! Their are so many activities you can do with your family. I think the important thing is that you are doing something together with all of your family. We've done all kinds of things for our activity, but here are some of them; play outside, make a craft, decorate cookies, board & card games, take treats to neighbors and friends, and yard work. One of our favorites is the Don't Eat Pete game that I have pictured in this post. The one above we received as a Christmas gift from friends. It's very nice, cute and laminated, so it will hold up well. It also has the directions printed on the back.

To play Don't Eat Pete, you use a small food item like Cheerios, M&M's, raisins, etc. and place one piece on each person. You pick one person to be "it" and then have that person go out of the room or hide their eyes while the rest of the group picks a person on the board to be Pete. Let "it" start to eat the food one piece at a time, when he goes to eat the piece that is on Pete everyone yells "Don't Eat Pete!" It is a cute game that my whole family likes to play!
We first played this game when my son was 2. A friend down the street made a game board(the one pictured at the bottom of the post) and gave them out at church and that's when we first played it. My son was "it" and finally got to Pete after eating almost every little Cheerio on the board. My husband and I said "Don't Eat Pete" and it scared him so bad! Poor little guy. He cried so bad and we ended the game. Luckily, their was no long term "Don't Eat Pete" trauma. He's 10 now and he gets excited when we play it. That game is just one of our favorites. Another one is "Hide The Thimble." Pretty simple. Just get yourself a thimble, send one person out of the room while another person hides the thimble, and then let the person come back in to find the thimble. A fun one!! I will also link you to a past post of the Candy Bar Game, which is another fun one! Enjoy those activities and have fun with your family!

 I'm continuing the Family Home Evening theme today with lessons or should I say ideas on where to get your lessons. When your kids are all different ages(mine are 2,6 and 10) it can be tricky to find ones that actually get their attention. Can't say that I've found the secret to that, but I have learned that even when you think they are not listening they might just surprise you with what they got out of it. I know this has happened to me. In the pic above are some of the resources we get our FHE lessons from; The Family Home Evening Resource Book, The Friend magazine, scriptures and pre-made lessons. Of course their are lots more resources than that, ie. internet, lesson manuals,or those you already have in your head,and etc. We've used the FHE resource book for many, many lessons and the kids really like the stories and ideas in The Friend. My husband is great at scripture stories so a lot of the time when it's his turn for the lesson he will do a scripture story with pics or have the kids act it out. That gets them involved and into the lesson and they usually like that. When it is their turn for the lesson, we try to give them ideas if they don't already have one. I have to say the gospel art picture kit is a great way to help them give their lessons. Although, our Trent man, who is 10, comes up with his own thing sometimes. I vividly remember a lesson he gave about making good choices and relating it to Star Wars and the dark side. That was right up his alley since he is a Star Wars fanatic. I'm really glad he got the correlation between the two. Another thing we have used is felt scripture stories and our felt board. A little something different.FHE is also a great time to have lessons on fire safety, an emergency plan, good manners ,etc. Now, I don't want you to think we always have nice, planned out , perfect little lessons cause we do not. We do try to plan, but even the best plan sometimes fails. Ours are usually short to hold their attention because we know they are really looking forward to the activity.

The lesson pictured above is from a group I was once in and we made lessons for everyone in the group. In this particular group their were 5 of us so we made 5 lessons. One for ourselves and one for everyone else. We included a song, lesson or story, treat recipe, visual aids for the lesson and some included a scripture. I really enjoyed this and still pull out those lessons and use them. The one above is about self worth. It is really cute. It talks about how we are all different , but have characteristics that make us special. I loved her little shape people cut outs, too. Some things I would suggest about an FHE lesson group is just to make sure the lesson isn't too involved or too long, document where you got your lesson or information, and make sure you read over the lessons you receive to make sure everything is accurate. You don't want to teach your family something you may not agree with or something that is false. So that's an important one to me. I know for us, having FHE and lessons can be hectic , but I know we will blessed for doing it anyway. What are some of your favorite lessons?
 It's Monday, so that means it's Made By You Mondays time at Skip To My Lou. Today I want to share our family's FHE (Family Home Evening )board that I made. This would also be a great time to tell you that this week I'll be featuring different FHE ideas;lessons, activities and treats. So, stop by for a look.
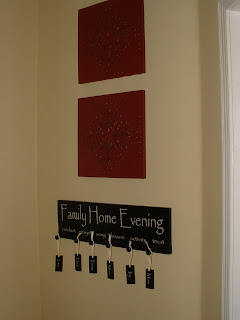
Now on to the board. These might be old news for some, but I realized I had never featured this on my blog. If you're not familiar with Family Home Evening, it is a night that members of our church set aside each week, usually a Monday night, to spend time with their family. No ballgames, no practices, etc. Just spending time with the family. It usually consists of a little lesson, song, activity and some sort of refreshment or treat. My kids always look forward to Monday nights!
To make our board,which hangs in the kitchen and helps us keep up with which persons turn it is to do different things, I purchased vinyl with the title "Family Home Evening and sub-titles"conduct, song, prayer, lesson, activity and treat."I also got our names printed twice. You'll notice that mom is the only one with two jobs up there. Gotta change that! I bought an inexpensive board from Lowe's and cut it to fit the title. Luckily, I found the pegs and small wood tags our names are on in the clearance section for $1 a pack on the clearance isle at our Wal-Mart.I sanded, spray painted , drilled holes for the pegs, and then glued them in. I tied on some ivory grosgrain ribbon to hang the tags by and then attached two picture hangers to the back . Did I mention I did all of it without my husband's help! The whole board,including vinyl, pegs,paint,etc. cost about$25. I thought that was pretty good. We've had other FHE things in the past,wheels,posters,which worked fine, but I thought this would last us a long time and to top it off it's pretty! The kids look forward to moving the tags for next week's FHE! Stop by this week to see more ideas!


 Here's a little something for all of you that like to mod podge. Embellished storage boxes. Isn't this box just so cute?! For the record, it is not my idea or project. My friend, Renee, that recently moved made this cutie. She also made one that housed a baby gift for my youngest daughter which you can scroll down and see.
To make the embellished boxes, she used a photo/video storage box from Hobby Lobby, measured and cut out scrapbook paper and then used Mod Podge to adhere it to the box with a coat on top, as well. Think of all the possibilities with the many different scrapbook papers that are available. Renee also used her Crop-a-dile to embellish the one she gave me with colored eyelets. Another cute and crafty touch. You could coordinate the boxes with just about any room decor or theme,too. They're a great way to store toys, books, small dolls, hats and more. You could also use it as a gift box as she did for my baby gift. I'm sure the recipient would be very pleased to get something that doubles as storage. We can all use more storage. Have fun mod podging!


 This year instead of an Easter basket, we are giving our kids an Easter sand bucket. I know,right. We're mixing it up and living on the edge. Hahaha!! Since we will be going to the beach in June, I thought, "why not?". We just store away their baskets,which, don't get me wrong, are always fun for the kids, but Easter is the only time they get used. My kids don't really care what the Easter goodies are housed in. They are just excited to get something fun for them. That said, the buckets will get a lot of use at the beach in a couple months.
I found these buckets with shovel at Wal-Mart for $1 each. My kind of price. Then I personalized each one by painting the kids' names on them with white acrylic paint. I'm not counting on the paint to stay on the buckets once the kids start playing with them. If I had a Cricut, which I SO want,or some other cutting tool, I would have used vinyl for their names and they would stay on longer. Use what you have, right. I then filled the buckets with goodies and a few small toys. I try not to go overboard because I know they will have had about 3 egg hunts,with candy, plus an Easter basket from Nana and Granddad by the time they even get their buckets on Easter Sunday. I hope they will like this fun bucket and look forward to using it at the beach!


