Monday, December 12, 2011
Chocolate Dipped Shortbread Meltaways
Can you believe it?! I'm actually posting a blog! I have just been busy with this and that and haven't really been feeling "the blog" lately. However, I thought I would share this yummy little cookie recipe. It would go great on a Christmas cookie plate. These Shortbread Meltaways are light and melt in your mouth delicious. I dipped some in chocolate and left some plain. Very good either way!
Shortbread Meltaways
1 c. butter, softened(do not use margarine)
1/2 c. confectioner's sugar
1 tsp. vanilla
1 c. all-purpose flour
2/3 c. cornstarch
chocolate almond bark
In a mixing bowl, cream butter and confectioner's sugar. Beat in vanilla. Combine the flour and cornstarch; gradually add to creamed mixture. Drop by teaspoonfuls onto ungreased baking sheets. Bake at 350 for 11-13 minutes or until bottoms are lightly browned. Cool for 5 minutes before removing from pans to wire racks. Meanwhile, melt about 1/2 package of almond bark according to package directions. Dip half of cookie in chocolate. Let cool.
**I think this recipe makes about 3 dozen cookies. The amount is not on my original recipe and I forgot to count them.
Friday, November 4, 2011
Rosettes
I finally made rosette pins! I've been seeing rosettes for a long time now all over the place and after seeing a sweet tutorial on Pinterest, I thought I'd give them a try. I made hounds tooth and crimson rosettes so I could wear them to an Alabama football game, but the possibilities are really endless with them. Use any color, pattern or fabric you want. I'm kind of bummed I didn't take step by step pics to show. Sorry. Once you get going, they are pretty easy. Mine are no where near perfect. You can see hot glue on the crimson one, but that's okay. Hopefully I'll get better the more I make. I will try to explain how to do it, but there are lots of tutorials out there. I am looking forward to making more of them!!
1. Cut a piece of fabric. Just depends on the size you want the rosette to be. For the larger ones, I did about a 5 inch long by 2 inch wide strip. For smaller ones, use less length.
2. Fold the fabric in half horizontally. You can iron it at this point so it stays down better.* Have your glue gun all fired up.
3. Start to roll your strip of fabric to make a center for the rosette.
4. Once you have a center, turn or twist the fabric as you go around the center and hot glue every so often so your fabric will stay together.
5. Once at the end of your fabric, just tuck it in the back of the rosette and hot glue.
6. Cut a small circle out of felt and hot glue to the back of the rosette.
7. Hot glue the pin or alligator clip to the felt. Let dry.
8. You can use beads, rhinestones, etc. for the center. Just hot glue to center of your rosette.
Not a great step by step, but hope it helps.
Thursday, October 20, 2011
Baby Subway Art
I've been having fun making different subway art recently and thought I would try something baby themed. A friend of mine had her fourth child back in the summer and I thought this might be cute and personal for the baby's room. I'm happy with the way it turned out. Hopefully it will go well in baby's room. Makes me want to try a baby girl themed one now!
Thursday, October 13, 2011
A Germ Free Halloween
Recently I sent my daughter to school with this sanitizer all prettied up for Halloween. I thought it would be a cute and useful little gift for her teacher to use in their class. I know school kids go through a lot of this stuff!
I used a bottle of Purell hand sanitizer that I pulled the front and back labels off of. It came off clean. If it hadn't, I would have used my Goo Gone to get off all the sticky stuff so I could have a clean surface. Then I just stuck on Halloween stickers I got at Hobby Lobby(you can't see some of them well, but they say GHOST,PUMPKIN,CANDY,SPOOK,SCARY,and BOO) and tied some coordinating ribbon. Simple, yet cute! Hope you have a germ free Halloween. Germs are scary!!
Monday, September 19, 2011
Peanut Butter Bars
How about some peanut butter bars for your Monday?!! You won't be disappointed with the peanut butter chocolatey goodness! Two of my favorites in one yummy dessert. Oh, they are so good!
I got this recipe from a friend years ago and every time I make it I'm reminded of how good these are. I think the best way to eat one is while it is still hot. So, when they have cooled down(if they last that long) just warm it up in the microwave for a bit to melt that chocolatey goodness! Enjoy!
Peanut Butter Bars
1 box yellow cake mix
2 eggs
1 stick butter, melted
1 c. peanut butter
1 (12 oz.) pkg. chocolate chips
1 can sweetened condensed milk
Mix cake mix, eggs, butter and peanut butter well. Spread half of mixture in an ungreased 9X13 pan. Bake at 350 for 10 minutes. Sprinkle with chocolate chips then drizzle with condensed milk. Pinch off the remaining peanut butter mixture and place on top of chips and milk. Bake an additional 25-30 minutes.
Thursday, September 15, 2011
Taco Dip
Ahhh, college football is here again! Woo!Hoo! I love watching the Crimson Tide on Saturdays, but not matter what team you pull for, you need some good food. This dip is one of my favorites! Great for watching the game! This dip is so, so simple, but very good! Just layer a few ingredients and you've got some yummy Taco Dip! No one will even mind if you use a Christmas platter like I did it's so good! Recipe is at the end of this post.
Taco Dip
1 can refried beans
1 (16 oz.) container sour cream
1 1/2 c. shredded cheddar cheese
1 envelope taco seasoning
tortilla chips
Spread refried beans onto a pizza pan or large round platter. Combine sour cream and taco seasoning mix.(If you like it spicier, use the whole envelope. Less spicy, use 1/2 envelope of seasoning)Spread sour cream mixture over top of refried beans. Top with shredded cheese. You could also sprinkle on some chopped olives, onions, tomatoes or put these out in small bowls with the dip so everyone can top theirs with the things they like. Serve with tortilla chips. Here, I've served mine with Baked Scoops.
Monday, September 12, 2011
Homemade Butter Cream Icing
Today I thought I'd share the recipe I use for butter cream icing. I've made two, 3-layer cakes in the past couple weeks and used this recipe for the icing. I've had the recipe for years and it's the one I always go to when I want to use homemade icing instead of canned. Of course, the consistency can be changed for making roses, borders, writing,etc. For 3 layer cakes, I double the recipe and usually have just a bit left over (which my son usually sneaks in and tries to eat when he "thinks" I'm not looking). It's delicious. Give it a try for your next cake!
Butter Cream Icing
1/2 c. (1 stick) butter, softened (not margarine)
1/2 c. shortening
1 tsp. vanilla
1/8 tsp. salt
1 lb. powdered sugar
3 Tbsp. milk (might use more or less, depending on consistency your going for)
In mixer, blend together butter, shortening, vanilla and salt. Add powdered sugar about 1/2 c. at a time. Add milk 1 Tbsp. at a time, mixing well after each addition. I check my consistency with a spoon after 2 Tbsp. milk to see if I need more milk. If you're just icing a cake and making a border, you'll want a medium consistency that's not too stiff and not too runny. For icing the cake, I use an offset spatula as well.
Friday, September 9, 2011
Build-A-Bear Birthday
Ivy got to go to Build-A-Bear Workshop for her birthday this year. She loved the bear her sister made there, so we knew she would like this little b'day trip! Their were so many animals to choose from, but she settled on this purple one with hearts and peace signs. She helped stuff her bear, give it a bath and pick out clothes for it. Ivy named her cute bear Lily and Lily hasn't left her side since we left the store. She loves that bear!
Giving her bear a bath!
And finally making a birthday wish!
Wednesday, September 7, 2011
Happy Birthday!!
Happy Birthday to Ivy!!! Our little miss priss is 4!!! She's been waiting a long time to celebrate her birthday and it's finally here! She's so excited!
We had her party with family and a couple friends on Monday! She had fun opening her gifts and eating strawberry cake and Neopolitan ice cream. Just what she requested! Happy Birthday to my "sugar and spice and everything nice" little girl! I'm so thankful I get to be her mommy!
Tuesday, August 30, 2011
The Classic Rice Krispy Treat
We LOVE Rice Krispy treats at our house! When their is a pan of these made, you better grab one while you can 'cause they're not gonna last long! I did manage to make them last a couple days so the kids could take a couple for school snack. In my opinion, the homemade Krispy treats are much better than the store bought ones. The packaged ones taste SO much sweeter to me and just not as fresh. Maybe that's just me. Don't get me wrong, my kids would eat packaged or homemade. They don't care. They just love this classic snack, as do I! Get the step by step recipe below.
1. You will need 3 Tbsp. margarine or butter(I like butter), 1 (10 1/2 oz.) pkg. mini marshmallows and 6 cups of Rice Krispy's cereal.(whichever brand you want)
2. Melt butter in large saucepan over low heat. Add marshmallows; stir until melted and mixture is smooth.
3. Remove pan from heat. Add the cereal; mix until well coated.
4. Press mixture firmly into a 13x9 pan that has been lightly greased with butter.(I find it helps to rub a little of the butter on my clean hands when I press these down so my hands don't stick)Cool completely; cut into squares.
Friday, August 26, 2011
Our Trip To The Fire Station
Earlier this week, Ivy and I got to visit our local fire station with some friends of ours. I was anxious to see how she would react to seeing these big fire trucks in person! She was a little reluctant at first, but warmed up to it.However, she was not having any part of putting on the boots and the big helmet, but a couple of the boys decided they would try it. The kids also got to get inside of the ladder truck and look around. We also saw all the ins and outs of the pumper truck. The firemen were nice enough to pull the ladder truck out of the garage and put the big ole ladder up. That thing was up there. I think one of the firemen said it would let out to 10 stories high! We got an extra treat as one of the firemen climbed the ladder to the top! OH,that made me so nervous! I didn't even know the man, but I was so nervous for him I could barely watch! He made it just fine.
The kids also got a coloring book, sticker and a fireman hat to take home. It was a fun trip!
Ivy sitting in the ladder truck!
Wednesday, August 24, 2011
Hot Car Crayons
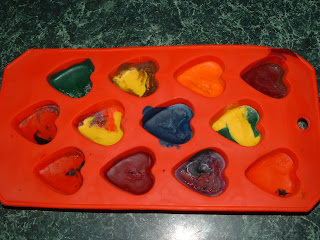
Recently my daughter and I tried a project that I pinned a while back called Hot Car Crayons. She had a good time helping make these and she LOVES coloring with her new heart crayons!
A cute and fun project! See the step by step instructions below.
1.First, make sure it's a nice, hot day out. (Which we have plenty of here in AL!) Have a silicone muffin or ice cube mold set out for your crayons. Get out your crayons and peel off the wrappers. (I read that Crayola crayons worked best for this so that is what we used. We do have an abundance of crayons!)
2. Break the crayons into small pieces that will fit into the molds. You can put the same color in each mold or mix up the colors, which is what I did.
3. Take your crayon filled mold out to your car and set it on the dash board. I put a paper towel underneath in case it melted over the sides. I left mine out for a couple hours, but it may not take that long. Just check it.
4. When the crayons have all melted, bring them inside to set up and get hard. You can just leave them out on the counter to do this or speed up the process by putting the mold in the freezer for a little while.
5. Pop the crayons out of the mold and start coloring! Both of my girls really like to color with the heart crayons! I'm on the lookout for other fun shapes we can make!
Subscribe to:
Posts (Atom)