Tuesday, August 10, 2010

Chirp! Chirp! I Love My Cricut!


Before we get to the Cricut, just wanted to say that the kids' first day of school went well. They both said they had a good day and were ready to go back this morning. We are getting back into our routine and are about to get busier with dance, piano and soccer. Chauffeur time!

Now to that little machine up there, the Cricut Expression. I finally bought one about a month ago.I know I've said numerous times on this blog,"if I had my own Cricut," "when I get my Cricut," "you could cut this out on your Cricut."So, now I have one!! Yay! But after further inspection, I had to send it back to Provo Craft(they paid for that)because the size dial didn't work, which took a week. They sent a brand new one back to me which took another week. Everything works and it is great, but it was so frustrating to have projects waiting and not be able to use my machine. I already had vinyl, transfer paper and cute stuff to do! Can't a girl use her Cricut!

The first thing I cut using the Cricut were the kids' names and intials for their water bottles for school. I think they turned out cute and the kids love them! By the way, I get my vinyl from Expressions Vinyl. I think they have good prices and they ship it pretty quick.


I also cut out monograms and tags for these plastic totes. I found the totes at Target dollar spot and thought they would be good to carry all those extra supplies like Kleenex, paper towels, hand soap etc. Hopefully more projects to share with you soon!!


Monday, August 9, 2010

First Day Of School


Today was the kids' first day of school for the 2010-2011 school year!! It has been a fun summer, but they are happy to go back to school and I am glad school is back in session , too. I'm so thankful they are excited about going back. That might wear off in a couple weeks! LOL!!

My big man, Trent, is a 6
th grader! Are you kidding me? That means 7th grade next year. Oh my! I don't even want to think about that right now! My little Laci bug is a 2nd grader! Seems like yesterday that I was taking her to her first day of kindergarten. Time does surely fly by fast.I love my little sweeties and hope they have a great first day!!

Not to be left out, miss Ivy thought she was just as big as the other two. She's in the picture with her lunchbox in hand(still in her pj's). She wants to go to school so bad, so her and I will be having some of our own school activities here at home.


Silly shot


Backpack shot


New shoe shot(they're always excited to have new shoes for school)

Wednesday, July 21, 2010

Homemade Fig Preserves


I've had the itch lately to make homemade jam. Last summer we made strawberry freezer jam and it was yum. Luckily we still have a couple in the freezer. So when I remembered some friends of ours have figs, I called them up and they said come and get all you want. The kids and I picked them last Friday, and Saturday I made fig preserves for the first time. I remember eating them and my Nanny making them...... along with all sorts of other things she canned. Those memories and smells just take me back to my childhood.So, After searching online and in cookbooks, I consulted my nanny (a few times during my jam making) to make sure I was making it right. I think the finished product turned out pretty good! I even remembered to write down the recipe I used, which is basically my Nanny's just adapted a bit by me.


Wash your figs well and then cut off the stems. I started out with a little bit shy of a gallon of figs.

Mash figs with a potato masher or whatever you have to mash with. My mashed figs equaled about 4 cups.

Transfer mashed figs to large pot or dutch oven on medium to medium high heat. Add 1 1/2 Tbsp. lemon juice, 5 to 6 cups of sugar(depending on how sweet you like it), and 1 1/2 c. to 2 c. water. Stir well. Bring mixture to a boil. Continue to boil. Stir frequently so mixture will not scorch. Cook for about 1 hr. to 1 hr. 15 mins. until the figs are translucent and mixture has thickened , but you don't won't thick gobs. It still needs to be runny to considerably thicker. I, like my nanny, spoon some out on a plate to taste and see the consistency. Fill sterilized jars,(while jam is cooking, I turn on the oven to around 170 degrees, set my jars on the cookie sheet and put them in the oven to sterilize until the jam is finished cooking. Then I take them out of the oven two at a time to fill. I put on the lids which have been on a low boil) using wide mouth funnel. Seal jars. Let cool. Also, write the date it was made and what it is on top of the lid. This recipe made 10, 1/2 pint jars.


Finished product! Homemade Fig Preserves!
We've already tried some on homemade waffles and it was very good if I do say so. Can't wait to try them on a biscuit. Homemade jams and jellies always make great gifts, too.

Tuesday, July 20, 2010

Chocolate Chocolate Chip Muffins


I thought I would share this delish muffin recipe even though it shows off my well worn, cruddy muffin pan that needs some steel wool taken to it. Just try to look past the pan. This muffin actually tastes a little more like a dessert. It goes great with a big glass of milk. My kids especially like these. Give 'em a try for breakfast......... or dessert! Get the recipe below.


Chocolate Chocolate Chip Muffins
1 c. sugar
1 3/4 c. all purpose flour
1/2 c. unsweetened cocoa powder
1/4 tsp. baking soda
2 tsp. baking powder
1/4 tsp. salt
2 eggs lightly beaten
1 c. milk
1 stick butter, melted
1/2 c. chocolate chips

Preheat oven to 375. Grease or line muffin pan with cupcake liners. Combine the flour, sugar, cocoa, baking powder, soda and salt in a medium bowl. Stir.Add the eggs, milk and melted butter. Stir until just blended. Stir in the chocolate chips. Spoon or scoop into prepared pan. Bake until puffed and a toothpick inserted in center comes out clean. About 18 to 20 minutes. Cool on wire rack for 5 minutes. Remove muffins. Makes 12 muffins.

Tuesday, July 13, 2010

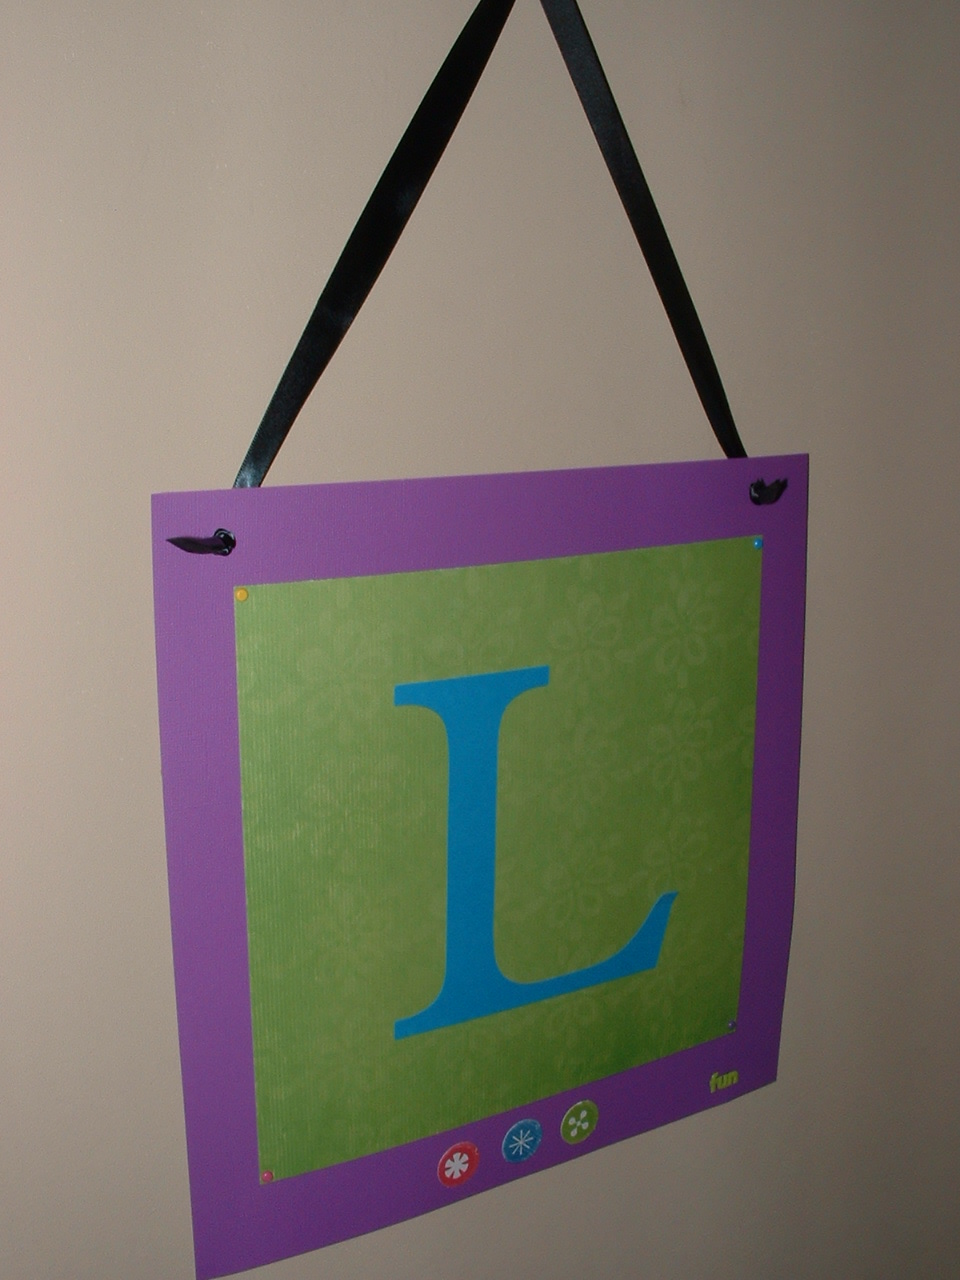
Monogrammed Wall Hanging


Before school was out, I was asked to do a class for our local middle school's 21st Century program. It's basically an after school program where the kids get to do different activities like crafts, horse back riding, exercise and more. The kids (ages 10-13) needed to be able to get everything done within an hour and I was asked to stick to using materials they already had instead of purchasing more. I looked through their stash of craft supplies and this is what I came up with. A monogrammed wall hanging. All of them, even the one boy in the group, loved having their monogram on something they could hang up.

I used a 12x12 sheet of textured card stock and then layered a coordinating color, green in this case,over the top. It was about a 10x10 piece, I think. Next, I cut out all of the kids' monogram using the school's Cricut and the Plantain Schoolbook cartridge.(By the way, mine should be here today. So excited to play with it!) I can't remember how big the letters were, but pretty big to take up that big space. I then glued it all together. I used different colored brads in the corners of the green paper and punched out some little circles for a pop of color at the bottom. Punch two holes and string some ribbon through. All of them except one girl put their own touches to it. I'm glad they liked it.


Monday, July 12, 2010

Blue Bell - We Came, We Saw, We Ate!


Do you recognize the cow on that building up there? Yep. That's the Blue Bell cow. When I see that picture I think of the the frozen goodness that is Blue Bell ice cream........and the exercise I will have to do to work it off.

A few weeks ago the kids and I along with my mother and grandmother traveled to Sylacauga, AL to take a tour of Blue Bell plant there. We got to see them making banana pudding ice cream, learned some interesting facts and ate some ice cream. Do you know what Blue Bell's #1 seller is? Yes, Homemade Vanilla. What about the #2 seller? Nope, it's not chocolate or strawberry. It's Cookies N' Cream. No one on our tour guessed that one. I was a bit surprised to hear that was #2, but after all it is a great flavor. Another BB fact for ya. They have freezers filled with pints and other treats in the break rooms. If you are an employee, you can have whatever you want,as much as you want,out of the freezers or even get a pint right off the floor where it's made. Cool....kind of. My hips would not like that!


Ivy sampled chocolate,Trent had butter pecan, Laci ate Southern Hospitality(vanilla ice cream, pecans, cherry swirl and pineapple pieces) and I had Southern Blackberry Cobbler(vanilla ice cream, blackberry swirl and pie crust pieces). So good!


Blue Bell Ice Cream Parlor

Friday, July 2, 2010

Candy Firecrackers and Fourth Fans


Check out these candy firecrackers and "fourth" fans! I think they are so sweet and festive. They're super easy, too! Both would make cute decorations, but those fans will come in handy, especially on a hot July day in Alabama. Kids will definitely like the firecrackers since it is candy, but these would also make fun party favors! Get the directions below.


To make candy firecrackers, I used packages of Rolo's candy, but Lifesavers would also work. Remove the wrapper, but not the gold foil wrapper. Cut decorative scrapbook paper the same size as the outer wrapper. Wrap the cut scrapbook paper around the Rolo's tightly and glue or use sticky strip. Now, to make it really look like a firecracker, cut about an inch off of a 4th of July garland and stick in the top. You've got a candy firecracker. Much safer and sweeter than the real thing.


Now on to the fans, which are so simple. I started out with a different concept for these, but just couldn't make it work. I stuck with this simplified version that actually works as a fan.
Just take a 12X12 sheet of decorative scrapbook paper and start folding pleats in it. You know, like you did in elementary school. When you've folded the length of the paper, take the two middle pieces, hold them together and staple together in 3 different spots. There's your fan! Enjoy!
Have a happy and safe holiday!!!
Related Posts Plugin for WordPress, Blogger...