Thursday, February 10, 2011
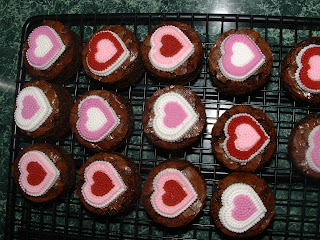
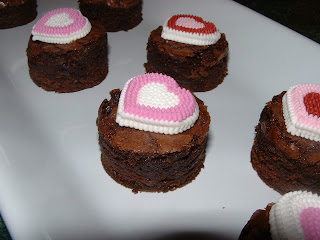
Valentine Brownie Bites
How about some cute brownie bites for Valentine's Day?! Umm....yes, please!
These little bites of love were very easy to make and look darling, too. I simply made a boxed mix(you can make homemade if you'd like) and let them cool completely. Then I used my Pampered Chef 1 1/2" biscuit cutter to cut out the brownies. I melted about a Tbsp. of chocolate chips and used that as my "glue" to put on the heart icing decorations which are from Wilton. You could also top them with a conversation heart or various other V-day candies.
These would make adorable treats for a school party or just a V-day dessert! Enjoy!
Monday, February 7, 2011
Cute Candy Jar
Over the weekend my husband put some of our older, backed up pictures on the computer because I was missing them. Turns out their were lots of pics of older crafts, cards and paper crafts that I had done. Score! I had forgotten all about them!
I came across this little candy jar I embellished originally as part of a Christmas gift. I think?? It also had an embellished Altoid tin with little handmade cards in it to round out the gift(I'll have to show that some other time). I thought this jar could easily work as a quick and cute Valentine gift as well. Maybe for a friend or teacher. Just use some red, pink, purple,etc. ribbon and change out the tag. Add any type of candy you like to this cute jar I found at Hobby Lobby,such as conversation hearts, heart gum drops, Dove chocolates, etc. Cute and easy!
Thursday, February 3, 2011
Valentine Marshmallow Pops
Yesterday my little assistant and I made some super cute valentine marshmallow pops. This treat is fast, simple and comes together with few ingredients. Ivy helped put the marshmallows on the sticks and dip them in chocolate. She loved it! She also loved sampling her sweet creation after it had time to dry.
To make marshmallow pops(for these I used the strawberry flavored marshmallows), melt almond bark in pot or double boiler, push marshmallows onto lollipop sticks, dip the marshmallows(about half way) and dust with sprinkles. Stick them into a piece of floral foam or styrofoam to dry. Yes, that's the easiest way, but I balanced mine just right in this little dish filled with chocolate chips because I didn't have any styrofoam. Let them dry and enjoy!
Ready to help!
Wednesday, February 2, 2011
Baking Tips & Tricks
Looks like it's another photo-less post today. So, sorry if you like pics, but I'm going to share some baking tips and tricks I learned at the King Arthur Flour baking demo. Refer to my previous post if you want to know more about that.
The demo guy, Frank, really knew what he was doing and he shared some things that I didn't know and that I'd like to use in my baking. I thought I'd share them! So here they are!
--When measuring flour, first, fluff it up with a fork or spoon because more than likely it has settled in the container. Then use the "sprinkle & sweep" method. That is, hold your measuring cup above your canister, scoop out flour with another scoop and sprinkle it into your measuring cup. Then use a spatula, knife,etc. to level it off. If you dip and then level you will more than likely be using more flour than your recipe calls for. Best way---use a kitchen scale!
--When your making bread, pie crusts, pastries,etc., the recipe usually says the dough needs to be a certain length. Well did you know that a standard size rolling pin barrel is 10 inches and one standard handle is 4 inches. So a standard rolling pin is about 18 inches. So no need to get out the ruler if you're using a rolling pin!
--What about doubling recipes? His rule was that if it is a tested or published recipe(KAF recipes) you can double it. However that does not include recipes that use yeast. You should make make the recipe as it says once and if you want more, just make it over again.
--Want a yummy homemade pie crust?Yeah, me too!Pat the dough out with the barrel of your rolling pin instead of rolling it.You want to pat it out(not whack it) or if you must roll it, only in one direction so you don't "confuse" the developing gluten in the dough. If you work your dough too long it will be tough. So work quickly.
These are just a few things I took notes on or remembered. Hope they help in your baking adventures!
Subscribe to:
Posts (Atom)